
Multiturn stop valves are very common at home for shutting down the hot and cold water supply faucet or toilet. The problem is that the sink or toilet water shut-off valve may leak and turn the handle. Usually change the filling valve of the toilet tank after closing the water.
The inner rubber hood wrap seals become less flexible with age to seal the stem completely.
Slow leaks around the stem, usually once or twice per minute, can cause water damage to the soil, soil, and walls over time. some stages how to fix leaky toilet shut off valve.
You May Like: How To Replace Toilet Bolts | Fixing Toilet Anchor Bolts Broken
[wp_ad_camp_1]
Contents
How to repair a leaky toilet shut-off valve
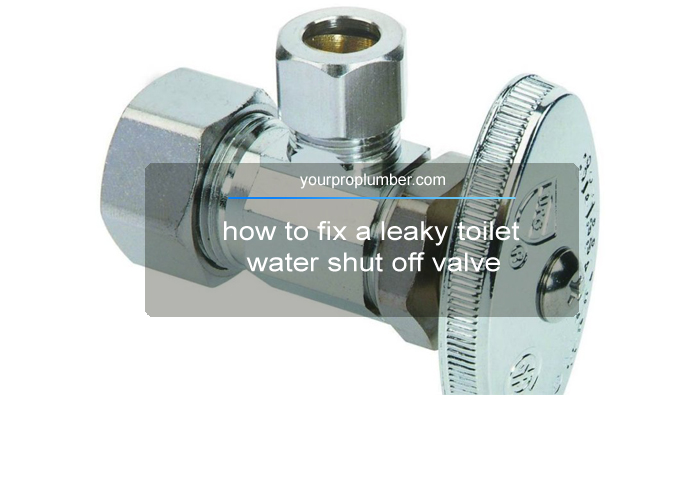
This is a “straight” shut-off valve with 1/2″ and 3/8″ compression fittings for toilet water supply. Straight means that the input and output are at opposite ends. The valve is a multiturn model because the handle rotates several times to open and close the valve.
The same multi-turn straight stop valve is also found in the hot and cold water tap to this bathroom sink, . The valves have compression fittings that connect to 1/2 inch copper pipes and 3/8 inch tap hoses.
The following are the right angle stop valves (also known as shut-off valves) for bath water supply:
Water Leak Shut-off Valve Fixing
For a leaky toilet water shut-off valve, the easiest solution is to tighten the package nut 1/4 turn with a wrench. Do not remove the valve, just tighten the packing nut. Hopefully this is enough to compress the rubber gasket so that it is sealed on the valve stem to prevent water leaks.
Does it work? If so, check again the next day to verify that it is a permanent solution and you’re done.
Valve stop repair kits
If your sink or toilet stop valve tightens the package nut and still leaked, inex) Immersive reconstruction kit can replace the washing machine wrapping the worn hood. The house warehouse carries Brass-Multirotary Valve Rod Repair Kit (Model: bcsr01, Shop #: 1000037226) for about $30. Hardware for stopper valve repair kits.
Before explaining how to install the repair kit, let’s look at how the multi-turn stop valve is assembled. The packing nut holds the hood packing washer in place and compresses it to seal the valve. Shut-off valves can last for many years without working. Aged bell packing washers do not bend as they should be, minerals in the water can accumulate by interfering with valve stem seals.
Here are completely disassembled shut-off valves, display brace washers, threaded shank (unscrew to remove from the stopper body), thrust washers, bell packing washers and packing nuts:
The stopper valve repair kit will provide a new bib washer, push washer and, most importantly, a new hood wrap washer. Components that fail when the shut-off valve leaked between the package nut and the stem.
Installing the Water Stop Valve Reconstruction Kit
Turn off the water supply throughout the house before installing a new hood that enveloped the washing machine with the valve opening. Water can be closed on the street near the water meter or the main valve at the service entrance at the home.
Why do you have to turn off the water all over the house? Because the packaging nuts and the hood packing washers are the only way to prevent high pressure water from spraying in the bathroom. If the water in the house has not turned off before removing the packing nuts!
Installation steps for the Water Stop Valve Repair Kit are as follows:
Turn off the water to the whole house.
Open cold taps in the kitchen, bathroom or outdoor plumbing bibs that are below sea level in the bathroom than the stopper valve in the bathroom. – Why? – Why? Because this will reduce the residual pressure in the cold water pipes and drain the water above the pipe where the valve stops. You do not want a few gallons of water to flow back from the open stop valve for second floor plumbing repairs and bathroom floor.
Rinse the toilet and hold the handle to drain the toilet slot.
This will minimize the amount of water from the hose of the toilet connector to the shut-off valve.
Remove the shut-off valve handle bolt, then remove the handle.
Unscrew the packing nut with a wrench. Unscrew the valve stem with your fingers. The packing washers and thrust washers will fall off along with the valve stem.
Slide the packing washers and thrust washers out of the valve stem.
Reusable if brass thrust washers are in good condition after cleaning. Clean the valve stem with a soft cloth to remove any clay or dirt.
Additional Information
Replace the hood gasket washers and brass thrust washers and tie washers with new ones.
Cleaning the hood packaging is the cause of leaks around the packing nut and valve stem.
The assembly is the reverse of disassembly.
Open the water house at the entrance of the water meter or main service.
After the closure was opened, they stopped splashing the air from the tap.
Open the valve to fill the toilet tank.
Tighten the packing washer 1/4 turn if it leaks. If necessary, repeat until the leak stops, but do not tighten the nut so much that it crushes the packing washers.
You May Like: How to Fix Super High Water Pressure | Diagnosing High Water Pressure